原创作者:
Fengjiajun
发布日期:2023年10月10日
Shopify安装Google Tag Manager并推送purchase购买事件
注意:由于shopify已改版更新,该教程已不适用!
本节教程介绍了Shopify如何安装Google Tag Manager,并推送purchase购买事件到Google Tag Manager。
一、Shopify如何安装Google Tag Manager:
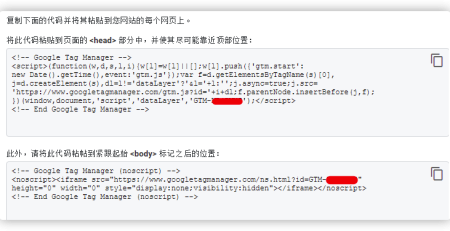
首先需要创建Google Tag Manager账户,并获取一段Google Tag Manager的安装代码,将代码复制并粘贴到下面的路径文件:
Online Store – Themes – theme.liquid 文件的head部分,还需在body标签前添加 GTM noscript 代码(用于兼容禁用 JS 的情况);
二、推送Shopify的purchase购买事件到Google Tag Manager:
找到左下角的Settings – Checkout – Additional Scripts,添加如下代码:
{% if checkout.order_confirmation_page %}
<script>
  window.dataLayer = window.dataLayer || [];
  dataLayer.push({ ecommerce: null }); // Clear previous ecommerce object
  dataLayer.push({
    event: "purchase",
    ecommerce: {
      transaction_id: "{{ checkout.order_number }}",
      value: {{ checkout.total_price | times: 0.01 }},
      tax: {{ checkout.tax_price | times: 0.01 }},
      shipping: {{ checkout.shipping_price | times: 0.01 }},
      currency: "{{ checkout.currency }}",
      items: [
        {% for line_item in line_items %}{
          item_id: "{{ line_item.product_id }}",
          item_name: "{{ line_item.title | escape }}",
          item_variant_id: "{{ line_item.variant_id }}",
          currency: "{{ checkout.currency }}",
          price: {{ line_item.final_price | times: 0.01 }},
          quantity: {{ line_item.quantity }}
        }{% unless forloop.last %},{% endunless %}
        {% endfor %}
      ]
    }
  });
</script>
{% endif %}
三、在Google Tag Manager中为purchase购买事件添加电子商务参数,首先我们需要创建一些变量:

其他对应的变量:
Ecommerce Items:ecommerce.items
Ecommerce Transaction ID:ecommerce.transaction_id
Ecommerce Value:ecommerce.value
Ecommerce Tax:ecommerce.tax
Ecommerce Shipping:ecommerce.shipping
Ecommerce Currency:ecommerce.currency
四、为购买事件创建触发器,便于Google ads转化跟踪调用: